 Pin It
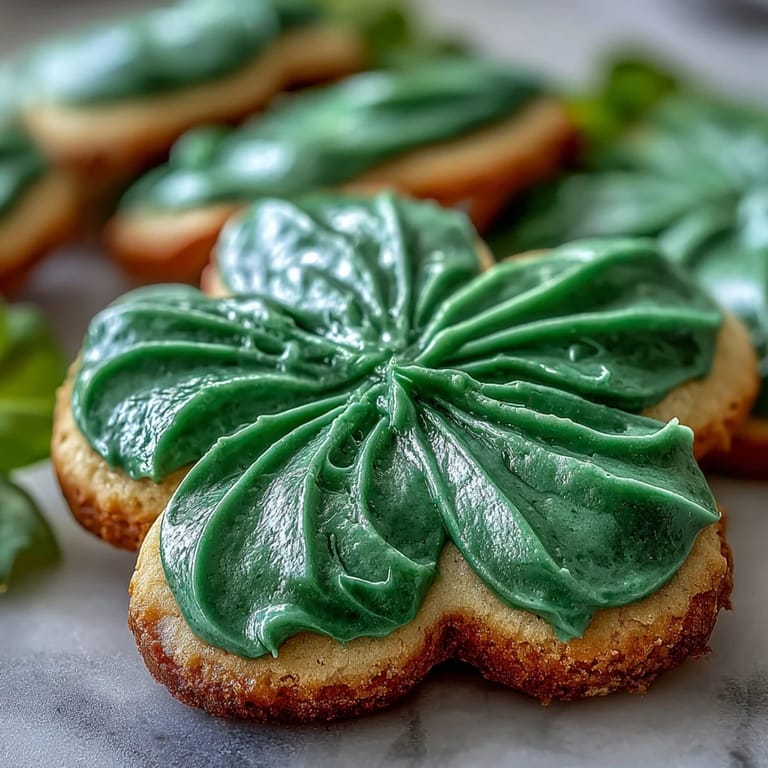
 My kitchen smelled like butter and vanilla on a gray March afternoon when my daughter announced we needed something green for her class party. We didn't have much time, and I wasn't sure I could pull off anything fancy, but then I spotted a shamrock cookie cutter buried in a drawer and everything clicked. Three hours later, we had two dozen gleaming green cookies lined up on the counter, and she was already planning which friends would get which ones. That's when I realized these weren't just cookies—they were tiny edible promises that spring was coming.
I made these for the first time while my son sat at the kitchen table doing homework, sneaking tastes of icing whenever I wasn't looking. He'd ask questions about why the cookies turned gold at the edges, why the icing had to be so smooth, things I'd never really thought about. By the time they were done, he'd learned something about baking without realizing it, and I'd remembered why cooking for people matters so much.
Ingredients
- All-purpose flour (2 1/2 cups): The foundation of everything—make sure to spoon it into your measuring cup rather than scooping directly from the bag, which packs it down and throws off your ratios.
- Baking powder (1/2 teaspoon): Just enough lift to keep cookies tender without making them cakey or puffy.
- Salt (1/4 teaspoon): A small amount that wakes up the butter and vanilla, making the flavor less one-dimensional.
- Unsalted butter (3/4 cup), softened: This is non-negotiable; room temperature butter creams properly and gives you those feathery light cookies everyone wants.
- Granulated sugar (1 cup): The soul of the cookie, creating structure and that subtle caramel note at the edges.
- Large egg (1): Acts as a binder and adds richness without making the dough greasy or heavy.
- Vanilla extract (2 teaspoons): Use real vanilla if you can; imitation has a harsh edge that shows up when nothing else is competing for attention.
- Almond extract (1/2 teaspoon, optional): A whisper of something floral and delicate that makes people wonder what's different about your cookies but can't quite name it.
- Powdered sugar (3 cups), sifted: Skip the sifting step and your icing will have tiny lumps that ruin that glassy finish.
- Egg whites (2 large) or meringue powder (4 tablespoons) with water (6 tablespoons): Meringue powder is pasteurized and safer if you're worried; egg whites give slightly glossier results.
- Green gel food coloring: Gel colors are concentrated and won't thin out your icing like liquid colors do.
- Sprinkles or edible glitter (optional): The finishing touch that takes them from homemade to special occasion.
Tired of Takeout? 🥡
Get 10 meals you can make faster than delivery arrives. Seriously.
One email. No spam. Unsubscribe anytime.
Instructions
- Gather and sift your dry ingredients:
- Whisk flour, baking powder, and salt together in a medium bowl so everything is evenly distributed. You're building a safety net for your dough that keeps it from spreading too much in the oven.
- Cream butter and sugar into clouds:
- Beat them together on medium speed for about 2 to 3 minutes until the mixture is pale and fluffy—this is where you're trapping air that makes cookies tender. Don't skip this step or rush it; the texture matters more than you'd think.
- Add your wet ingredients with intention:
- Drop in the egg, vanilla, and almond extract (if using), mixing until everything is combined and smooth. The dough should look creamy and come together without any visible streaks of butter.
- Bring wet and dry together gently:
- Add your flour mixture slowly while mixing on low speed, stopping as soon as no flour is visible. Overmixing here toughens the cookies, and you want them to melt on your tongue, not feel tough and dense.
- Rest the dough in the cold:
- Divide dough in half, shape each piece into a disk about an inch thick, wrap tightly in plastic wrap, and refrigerate for at least 1 hour. Cold dough rolls cleaner, cuts sharper, and resists spreading in the oven.
- Heat your oven and prepare for baking:
- Preheat to 350°F (175°C) and line your baking sheets with parchment paper to prevent sticking and ensure even browning.
- Roll and cut with precision:
- On a lightly floured surface, roll dough to about 1/4-inch thickness—not too thin or they'll shatter, not too thick or they'll bake unevenly. Use your shamrock cutter to create shapes and place them evenly on your prepared sheets.
- Bake until golden whispers appear:
- Bake for 9 to 11 minutes; you're looking for just the faintest gold creeping in at the edges while the centers stay pale. They'll harden more as they cool, so don't wait for them to feel crispy in the oven or you'll end up with biscotti.
- Cool with patience and strategy:
- Leave cookies on the baking sheet for 5 minutes to set, then move them to a wire rack to cool completely. Icing hot cookies will melt and slide off; cool cookies hold it like they were made for each other.
- Make icing that shines:
- Beat powdered sugar with egg whites (or meringue powder and water) and vanilla on medium speed for about 5 minutes until you have stiff peaks and a glossy shine. This takes longer than you think, but the effort creates that signature royal icing look.
- Tint with color and control:
- Divide icing into bowls and add green gel food coloring a tiny bit at a time, stirring after each addition. Gel color is concentrated, so a drop goes a long way—add too much too fast and you'll end up with something closer to jade than spring green.
- Decorate with intention:
- Transfer icing to piping bags with small round tips, outline your shamrocks first with a thin line, then flood the center with slightly thinner icing. The outline sets first, creating a dam that keeps your fill from spreading onto bare cookie.
- Wait for perfection to set:
- Let cookies sit untouched for at least 1 hour before stacking, packaging, or serving so the icing hardens completely and won't smudge or stick together.
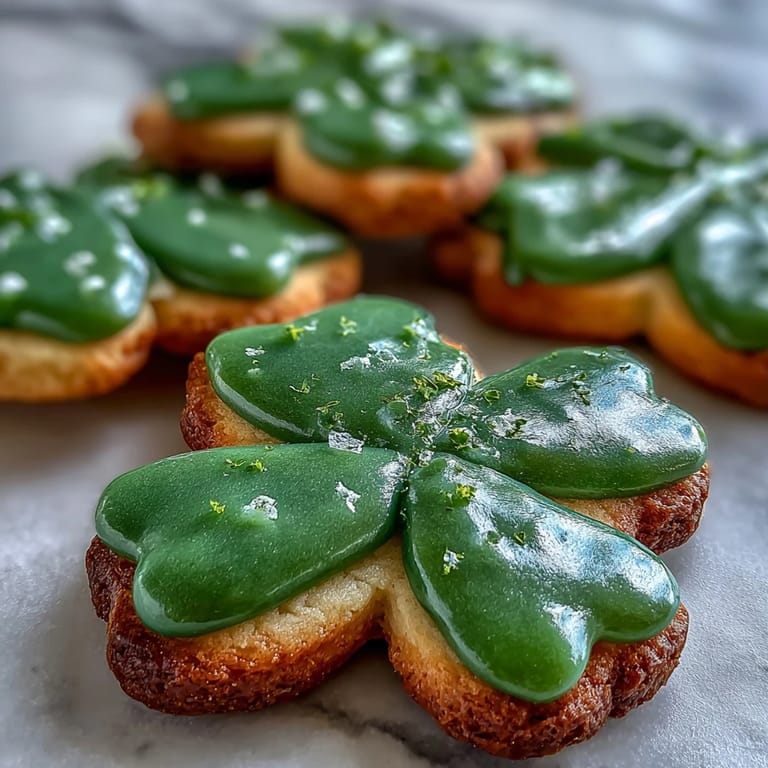 Pin It
 The moment I knew these cookies were keepers was when my neighbor came by and asked for the recipe, then made them for her book club and had someone ask if she'd bought them from a bakery. There's something about a handmade treat that tastes good and looks impressive that changes how people feel about you for a moment.
The Science of Tender Cookies
The secret to cookies that melt instead of crunch comes down to how much you develop the gluten in the flour. Sugar and fat tenderize the dough by getting in between gluten strands and interrupting them, so creaming butter and sugar together isn't just about air—it's about setting yourself up for texture. When you add flour last and stop mixing as soon as it comes together, you're preserving that tender promise. I learned this the hard way after making batch after batch of tough cookies before someone finally explained why mine felt like little hockey pucks compared to my grandmother's.
Royal Icing Magic and Mishaps
Royal icing intimidated me for years because it seemed like something only professional decorators could master, but it's actually just three ingredients that know what they're supposed to do. The egg whites whip up with powdered sugar into a foam that dries hard and glossy, perfect for turning plain cookies into gifts. I discovered by accident that meringue powder works beautifully if you're nervous about raw eggs, and the results are virtually identical. What I wish I'd known sooner is that humidity affects icing consistency; on damp days you might need slightly less liquid, and on dry days you might need slightly more, so always taste the stiffness and adjust from there.
Customization Ideas That Make Them Your Own
These cookies are a blank canvas waiting for your personal touch, whether that's a different shape, a new flavor note, or an entirely different color scheme. I've made them with lemon zest stirred into the dough, with peppermint extract instead of almond, with gold icing for winter parties and pink icing for spring celebrations. The formula is strong enough to handle variations without falling apart, which is the mark of a recipe that really works. Once you understand how the components work together, you can play with confidence and create something that feels like yours.
- Add lemon or almond zest to the dough for a subtle flavor upgrade that feels more sophisticated.
- Swap the green icing for gold, white, red, or any color that matches your celebration or mood.
- Use a tiny paintbrush to add details after the icing sets if you're feeling artistic, or keep it simple and elegant.
 Pin It
 These cookies have become part of how I mark the calendar, a small green reminder that someone thought enough of me to spend an afternoon in the kitchen. There's real magic in that.
Recipe FAQs
- → How do I get the royal icing to be glossy?
Beat powdered sugar with egg whites or meringue powder and a splash of vanilla or lemon juice until stiff peaks form, ensuring a smooth, shiny finish.
- → Can I prepare the dough ahead of time?
Yes, chilling the dough for at least an hour before baking helps maintain shape and enhances flavor.
- → What is the best thickness for rolling the dough?
Roll the dough to about 1/4-inch thickness to achieve tender yet sturdy cookies perfect for decorating.
- → Are there alternatives to almond extract?
Almond extract adds subtle flavor but can be omitted or replaced with additional vanilla for nut sensitivities.
- → How should I store the decorated cookies?
Once the icing sets completely, store cookies in an airtight container at room temperature for up to 2 days.