 Pin It
 My niece burst into the kitchen last October holding up a magazine cutout of vampire bite cookies, convinced they were the only acceptable Halloween treat. I'd never made them before, but something about her theatrical horror-movie voice as she explained the "blood dripping down" sold me immediately. That afternoon, flour dust everywhere and her sticky fingers helping press the dough, we created something that felt equal parts spooky and genuinely delicious. Now every year she texts me a reminder, as if I could forget the cookies that made her believe I was a dessert magician.
I'll never forget watching my coworker's jaw drop when I brought a box of these to the office party, watching her actually gasp at the vampire bite detail before tasting one. She went back for a third cookie and asked if I'd been holding out on her all year. Seeing people genuinely delighted by something you made, not just politely eating it, that's when baking stops feeling like a chore and becomes something you actually want to do again.
Ingredients
- All-purpose flour (2 1/4 cups): This is your foundation, and sifting it once keeps the cookies tender rather than dense, though honestly a good whisk works too if you're impatient like I usually am.
- Unsalted butter (3/4 cup), softened: Room temperature is non-negotiable here because cold butter won't cream properly and you'll end up with a grainier texture that throws off the whole tender vibe.
- Granulated sugar (1 cup): This sweetens the dough and creaming it with butter incorporates air, which gives you that light, slightly cakey structure these cookies need.
- Egg (1 large): Binds everything while adding richness, so don't skip it or substitute unless you really know what you're doing.
- Vanilla extract (1 1/2 tsp): Pure vanilla tastes noticeably better than imitation, and at this amount it adds warmth without overpowering the buttery flavor.
- Baking powder (1/2 tsp): Gives just enough lift so the cookies puff slightly in the oven, then settle into that perfect tender-but-structured shape.
- Powdered sugar (1 cup), sifted: For the icing, this dissolves smoothly and creates that glossy finish that really sells the "blood" effect.
- Red gel food coloring: Gel holds its color better than liquid, so your icing stays that dramatic vampire-bite red instead of fading to pale pink by serving time.
- Light corn syrup (1/2 tsp): This small amount adds shine to the icing, making it look wet and fresh rather than flat and matte.
Tired of Takeout? 🥡
Get 10 meals you can make faster than delivery arrives. Seriously.
One email. No spam. Unsubscribe anytime.
Instructions
- Prep your mise en place:
- Line baking sheets with parchment and preheat your oven to 350°F. Whisking together the flour, baking powder, and salt in one bowl saves you from discovering mid-mixing that you forgot the baking powder.
- Cream the butter and sugar:
- Beat them together for about two minutes until the mixture turns pale and fluffy, which means you're aerating it properly. If it still looks grainy or separated, keep going for another 30 seconds—you'll feel the difference.
- Add the egg and vanilla:
- Mix on low speed until combined, scraping down the bowl so everything incorporates evenly. This step goes fast, so don't overthink it.
- Bring the dough together:
- Add the flour mixture gradually on low speed until a soft dough forms without any visible flour streaks. Overmixing makes cookies tough, so stop as soon as you see cohesion.
- Shape and space the cookies:
- Scoop tablespoon-sized portions, roll them into balls, then flatten gently with your palm until they're about 1/4 inch thick. Leave two inches between each one because they'll spread just slightly while baking.
- Bake until golden:
- Watch for the edges to turn light golden, which happens around 10 to 12 minutes depending on your oven. The centers should still look barely set when you pull them out, almost underbaked, because they'll firm up as they cool.
- Cool strategically:
- Let them sit on the baking sheet for five minutes to firm up just enough that you can move them without breaking, then transfer to a wire rack to cool completely. This two-stage cooling prevents them from becoming hard and brittle.
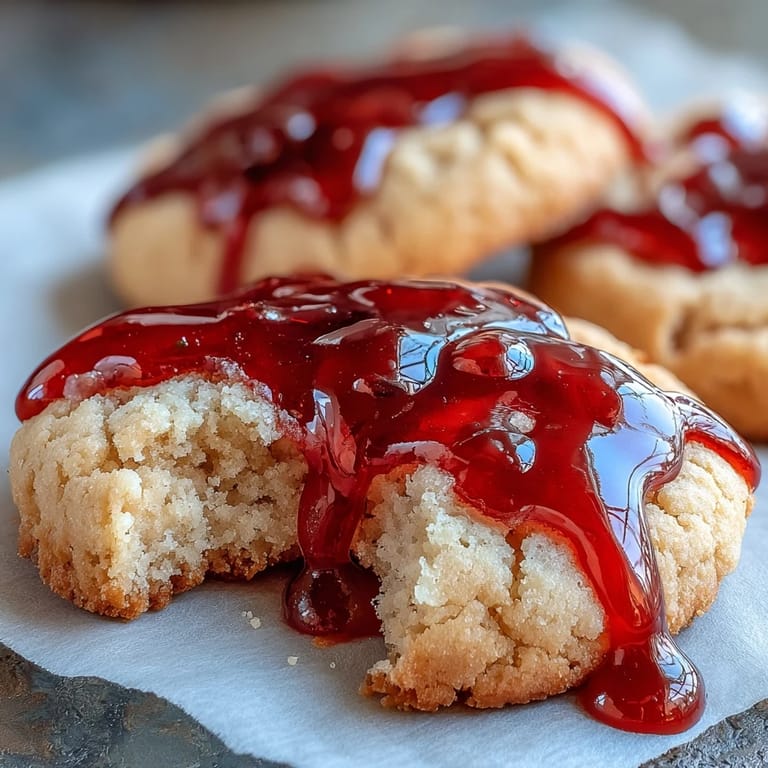
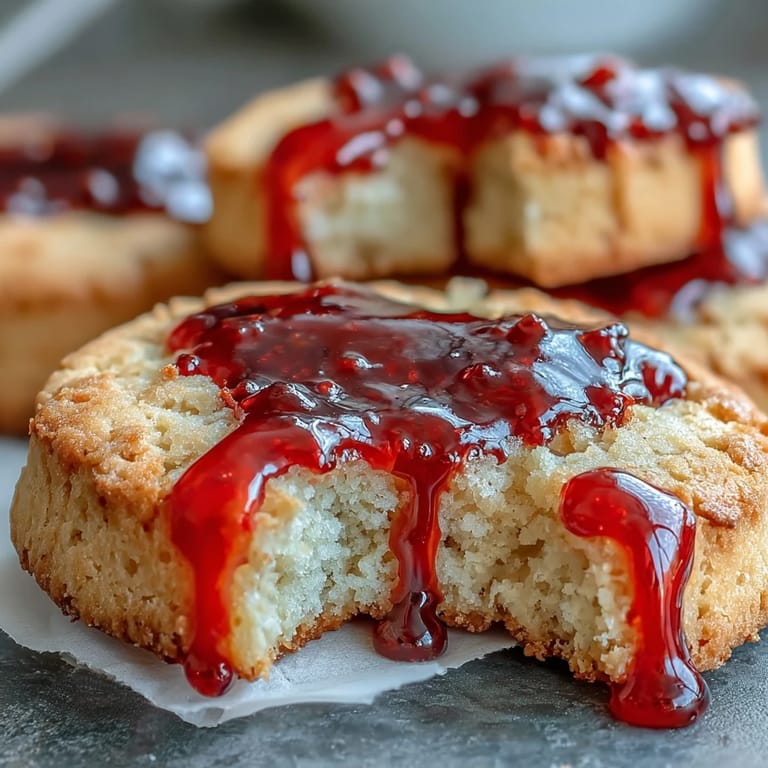
- Create the vampire bite marks:
- Once fully cooled, use a thin straw or chopstick handle to gently poke two holes near the edge of each cookie, tilting slightly inward so they look like an actual bite. Go slowly so you don't crack the cookie.
- Mix the blood icing:
- Combine sifted powdered sugar with milk, corn syrup, and red gel food coloring until you have a thick but pipeable consistency. Add milk one teaspoon at a time because it's easier to thin than thicken.
- Fill and drip dramatically:
- Using a toothpick or small piping bag, fill those bite marks with red icing and let it drip downward naturally for maximum vampire effect. Don't overthink the placement—imperfect drips look more authentic than perfectly symmetrical lines.
- Add optional detail:
- If you're feeling fancy, use black or dark red gel icing on a toothpick to outline the bites or add fangs, but honestly the red alone is already striking enough.
- Let everything set:
- Give the icing 15 to 20 minutes to dry before stacking or packaging, otherwise you'll transfer red smudges everywhere.
 Pin It
 There's something genuinely magical about handing someone a cookie where the details matter so much that the whole thing shifts from "cute dessert" to "actual edible art." My partner took one bite and immediately started laughing about the vampire theme, and suddenly we were both riffing on terrible jokes about blood type cookies and Count Chocula references. That's when I realized these aren't just Halloween props disguised as baked goods—they're actually delicious buttery cookies that happen to have a personality.
Make-Ahead and Storage Wisdom
I learned the hard way that unbaked cookie dough keeps beautifully in the fridge for up to three days, which means you can scoop and flatten all your portions the night before and then bake them fresh in the morning. The dough also freezes well for up to three months, so after you've made them once, future Halloweens become refreshingly simple. Once baked and iced, these cookies stay fresh in an airtight container for about five days, though they rarely last that long in any house I've brought them to.
Flavor Variations Worth Exploring
The base dough is honestly versatile enough that you can swap in almond extract (add just 1/4 teaspoon) for a subtle nuttiness that pairs beautifully with that blood-red icing. I've also added a tiny pinch of cinnamon before baking, which gives the whole thing a spicy undertone that feels vaguely vampiric in a different way. Some friends have dusted the cooled cookies with a little cinnamon sugar before icing, which adds texture and makes them feel less purely sweet.
Why These Cookies Actually Work
The magic here is that you're taking something universally beloved—soft, buttery sugar cookies—and giving them a specific personality through two simple decorative details that take maybe five extra minutes. Kids love the bite marks because they're genuinely silly, adults appreciate that the cookies taste genuinely good and not like sugar-and-food-coloring pretense, and the whole thing screams "homemade" without requiring advanced piping skills. The softness of the dough means they forgive minor imperfections, so even if your bite marks aren't symmetrical or your icing drips unevenly, the whole thing still reads as intentional and charming.
- If you're making these for a crowd, bake and ice them the morning of your party so the icing is still glossy and looks fresh.
- Keep a damp paper towel nearby while poking the bite marks so you can wipe off crumbs and keep the edges clean.
- Remember that red food coloring intensifies slightly as it sits, so your icing might look a shade darker after 30 minutes than it did when you first mixed it.
 Pin It
 These cookies have genuinely become the treat people text me about in early October, which is the highest compliment any recipe can receive. Make them once and you'll understand why—they're beautiful, they taste wonderful, and they turn ordinary Halloween into something memorable.
Recipe FAQs
- → How can I ensure the cookies stay soft after baking?
Bake until edges just turn golden and remove promptly. Cooling on the baking sheet for a few minutes before transferring helps retain moisture and softness.
- → What gives the red icing its glossy shine?
Light corn syrup is added to the powdered sugar and milk mixture, creating a smooth, shiny finish that mimics a dripping blood effect.
- → Can I substitute ingredients for dietary preferences?
Gluten-free flour blends can replace all-purpose flour, and almond extract may be used to enhance flavor. Be mindful of allergen labels in coloring and corn syrup.
- → What's the best technique to create bite marks on the cookies?
Use a straw or the end of a chopstick to gently poke two indentations near the cookie edge once cooled, providing a neat, dramatic bite detail for icing.
- → How can I decorate the cookies to make them more striking?
Adding black or dark red gel icing around the red icing adds depth and detail, enhancing the spooky vampire bite appearance.